> ## Documentation Index
> Fetch the complete documentation index at: https://docs.fireworks.ai/llms.txt
> Use this file to discover all available pages before exploring further.
# Remote Agent Quickstart
> Train an SVG drawing agent running in a remote environment
**Reinforcement Fine-Tuning (RFT)** is free for models under 16B parameters. When creating an RFT job in the UI, filter for free tuning models in the model selection area on the [fine-tuning creation page](https://app.fireworks.ai/dashboard/fine-tuning/create). If kicking off jobs from the terminal, you can find the model ID from the [Model Library](https://app.fireworks.ai/models?filter=LLM\&tunable=true). Note: SFT and DPO jobs are billed per training token for all model sizes—see the [pricing page](https://fireworks.ai/pricing) for details.
**Following the [RFT Overview](/fine-tuning/reinforcement-fine-tuning-models)?** This is the **Remote Agent Training** path—for training agents that run in your production infrastructure.
In this quickstart, you'll train an agent to generate SVG drawings. Your agent runs in a remote server (Vercel), which means rollouts happen remotely while Fireworks handles the training. This approach lets you train agents that already live in your production environment.
Here's a quick walkthrough:
## What You'll Learn
* **Apply RFT to production agents** — Train models that work with remote servers and existing infrastructure
* **Remote rollout processing** — Connect your production environment to Fireworks RFT using Eval Protocol
* **Monitor and debug training** — Track progress, inspect rollouts, and debug issues with live logs
## 1. Installation
1. **Clone the quickstart repo**: [https://github.com/eval-protocol/quickstart](https://github.com/eval-protocol/quickstart)
```bash theme={null}
git clone git@github.com:eval-protocol/quickstart.git
cd quickstart
```
2. **Install Eval Protocol**:
```bash theme={null}
pip install "eval-protocol[svgbench]"
```
3. **Environment Setup**:
The `env.example` file is located in the `evaluator/` directory. Make a copy of it in the same directory, name it `.env`, and fill in your API keys:
```bash theme={null}
cp evaluator/env.example evaluator/.env
```
Then edit `evaluator/.env` with your API keys:
```
FIREWORKS_API_KEY=your-fireworks-key-here
OPENAI_API_KEY=your-openai-key-here
```
The create process below automatically reads and uploads these secrets to Fireworks.
For more details on Fireworks Secret Management usage, please refer to [using secret in evaluator](/fine-tuning/using-secret-in-evaluator).
## 2. Test your evaluator locally
Test your evaluator locally before launching training, to verify everything works with your rollout processor.
**Terminal 1** - Start the local UI server to view results:
```bash theme={null}
ep logs
```
**Terminal 2** - Kick off the test:
```bash theme={null}
cd evaluator
ep local-test
```
This command discovers and runs your `@evaluation_test` with pytest. In this case, it builds an image and runs the test in Docker, because a `Dockerfile` is present.
The test automatically uses our Vercel remote server:
```
rollout_processor=RemoteRolloutProcessor(
remote_base_url="https://vercel-svg-server-ts.vercel.app",
)
```
If you want to use a local development Vercel server instead, see [Local Development Server](#local-development-server).
**Note:**
* If your evaluation setup has custom system dependencies (e.g., Chromium), add a `Dockerfile`. When you run `ep local-test`, it will build an image and run `pytest` inside Docker.
* If you don't need Docker, `ep local-test` will run `pytest` on your host machine by default.
* You can ignore the `Dockerfile` and force host execution with: `ep local-test --ignore-docker`.
RFT evaluators run in sandboxed environments. Your Dockerfile must follow these constraints:
**Base image:**
* Only Debian-based images are supported (e.g., Debian, Ubuntu, or `python:3.x-slim`)
* Alpine, CentOS, and other non-Debian distros are not supported
* If no Dockerfile is provided, the system uses a default Python environment with common packages pre-installed
**Supported instructions:**
* `FROM`: Base image (required, only one allowed)
* `RUN`: Execute commands
* `COPY` / `ADD`: Copy files into the image
* `WORKDIR`: Set working directory
* `USER`: Set the user
* `ENV`: Set environment variables
* `CMD` / `ENTRYPOINT`: Set the start command
* `ARG`: Build-time variables
**Unsupported features:**
| Feature | Status |
| ---------------------- | ----------------------------------------- |
| Non-Debian base images | ❌ Not supported (no Alpine, CentOS, etc.) |
| Multi-stage builds | ❌ Not supported (only one `FROM` allowed) |
| `EXPOSE` | ⚠️ Ignored |
| `VOLUME` | ⚠️ Ignored |
**Example Dockerfile:**
```dockerfile theme={null}
FROM python:3.11-slim
WORKDIR /app
# Install system dependencies
RUN apt-get update && apt-get install -y \
chromium \
&& rm -rf /var/lib/apt/lists/*
# Install Python dependencies
COPY requirements.txt .
RUN pip install --no-cache-dir -r requirements.txt
# Copy evaluator code
COPY . .
CMD ["pytest", "-vs"]
```
Multi-stage Dockerfiles will fail during the evaluator build. Use a single `FROM` instruction and install all dependencies in one stage.
### Expected Test Output
Navigate to [http://localhost:8000](http://localhost:8000) to see the Eval Protocol UI.
```
INFO:eval_protocol.pytest.remote_rollout_processor:Found status log for rollout democratic-way-12: Rollout democratic-way-12 completed
INFO:eval_protocol.pytest.remote_rollout_processor:Found Fireworks log for rollout democratic-way-12 with status code 100.0
INFO:eval_protocol.adapters.fireworks_tracing:Successfully converted 1 traces to evaluation rows | 3/8 [00:19<00:22, 4.52s/rollout]
...
Runs (Parallel): 100%|████████████████████████████████████████████| 1/1 [00:31<00:00, 31.07s/run]
PASSED
```
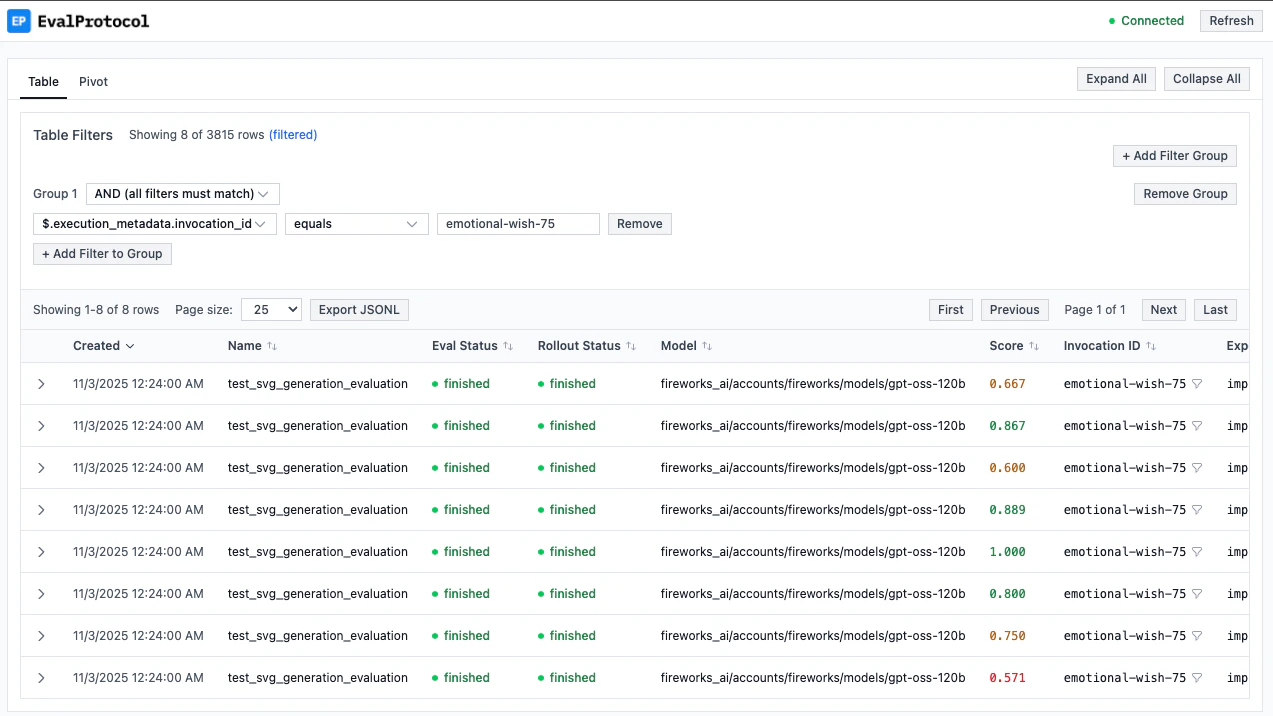 If you're interested in understanding how Remote Rollout Processing works and how it communicates with the remote server, see [How Remote Rollout Processing Works](#how-remote-rollout-processing-works).
## 3. Start training with a single command
To kickoff training, simply do:
```bash theme={null}
eval-protocol create rft \
--base-model accounts/fireworks/models/qwen3-0p6b \
--chunk-size 10
```
This command:
1. Uploads secrets — reads your `.env` and uploads API keys as Fireworks secrets
2. Uploads evaluator — packages and uploads your evaluation code
3. Waits for build — polls evaluator status until ACTIVE (timeout: 10 minutes)
4. Creates dataset — uploads your `svgbench_dataset.jsonl`
5. Launches RFT job — starts reinforcement fine-tuning with your evaluator
### Configuration & Troubleshooting
**Training Parameters**: We use Eval Protocol's default values for training parameters (batch size, epochs, learning rate, LoRA rank, accelerator count, etc.). For a complete list of available RFT flags you can customize, see [Fireworks RFT Command Documentation](/tools-sdks/firectl/commands/reinforcement-fine-tuning-job-create).
**Changing Evaluators**: If you've made changes to your evaluator code and want to upload a new version:
```bash theme={null}
eval-protocol create rft \
--base-model accounts/fireworks/models/qwen3-0p6b \
--chunk-size 10 \
--force
```
**Evaluator Upload Timing Out**: If your evaluator takes longer than 10 minutes to build, you'll see:
```
⏰ Timeout after 10.0m - evaluator is not yet ACTIVE
❌ Evaluator is not ready within the timeout period.
📊 Please check the evaluator status at: https://app.fireworks.ai/dashboard/evaluators/test-svgagent-test-svg-generation-evaluation
Wait for it to become ACTIVE, then run 'eval-protocol create rft' again.
```
In this case, monitor the evaluator upload at the link, and run the command again when ACTIVE.
## 4. Monitor Training Progress
After successful job creation, you'll see:
```
✅ Created Reinforcement Fine-tuning Job
name: accounts/pyroworks/reinforcementFineTuningJobs/sdnld4yn
📊 Dashboard Links:
Evaluator: https://app.fireworks.ai/dashboard/evaluators/test-svgagent-test-svg-generation-evaluation
Dataset: https://app.fireworks.ai/dashboard/datasets/svgbench-dataset
RFT Job: https://app.fireworks.ai/dashboard/fine-tuning/reinforcement/sdnld4yn
```
Click on the **RFT Job** link to view real-time training progress, epoch counts, and rollout data.
### Training Results
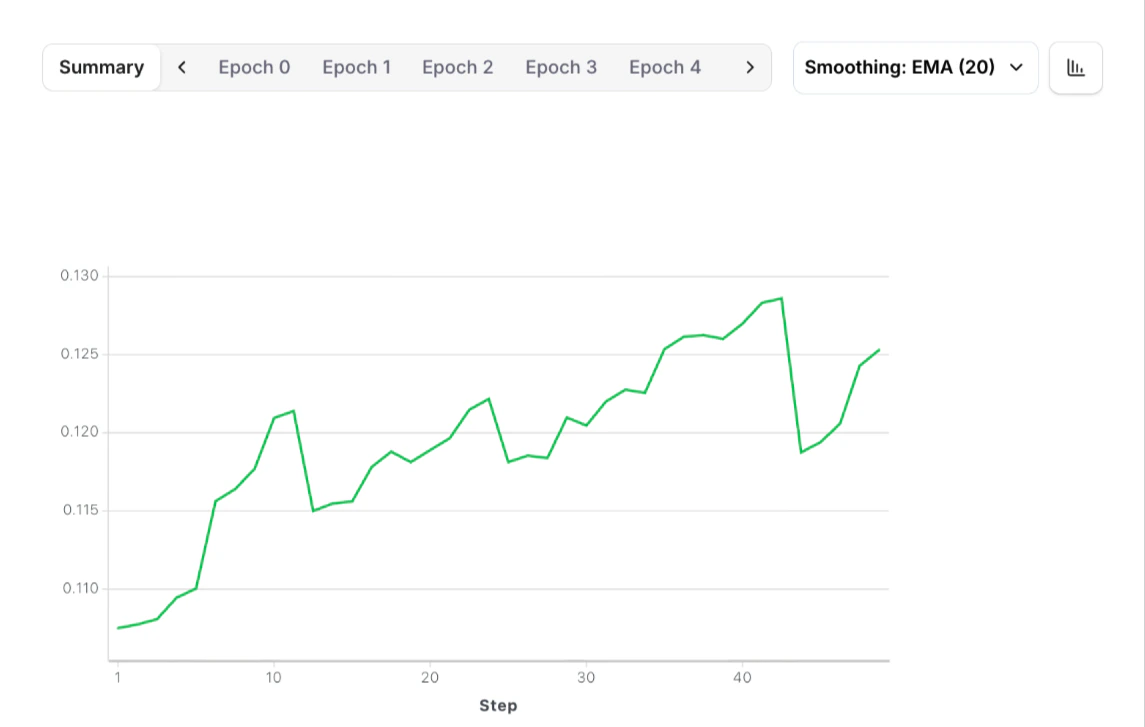
After successful training, you should see performance improvements reflected in the training metrics:
If you're interested in understanding how Remote Rollout Processing works and how it communicates with the remote server, see [How Remote Rollout Processing Works](#how-remote-rollout-processing-works).
## 3. Start training with a single command
To kickoff training, simply do:
```bash theme={null}
eval-protocol create rft \
--base-model accounts/fireworks/models/qwen3-0p6b \
--chunk-size 10
```
This command:
1. Uploads secrets — reads your `.env` and uploads API keys as Fireworks secrets
2. Uploads evaluator — packages and uploads your evaluation code
3. Waits for build — polls evaluator status until ACTIVE (timeout: 10 minutes)
4. Creates dataset — uploads your `svgbench_dataset.jsonl`
5. Launches RFT job — starts reinforcement fine-tuning with your evaluator
### Configuration & Troubleshooting
**Training Parameters**: We use Eval Protocol's default values for training parameters (batch size, epochs, learning rate, LoRA rank, accelerator count, etc.). For a complete list of available RFT flags you can customize, see [Fireworks RFT Command Documentation](/tools-sdks/firectl/commands/reinforcement-fine-tuning-job-create).
**Changing Evaluators**: If you've made changes to your evaluator code and want to upload a new version:
```bash theme={null}
eval-protocol create rft \
--base-model accounts/fireworks/models/qwen3-0p6b \
--chunk-size 10 \
--force
```
**Evaluator Upload Timing Out**: If your evaluator takes longer than 10 minutes to build, you'll see:
```
⏰ Timeout after 10.0m - evaluator is not yet ACTIVE
❌ Evaluator is not ready within the timeout period.
📊 Please check the evaluator status at: https://app.fireworks.ai/dashboard/evaluators/test-svgagent-test-svg-generation-evaluation
Wait for it to become ACTIVE, then run 'eval-protocol create rft' again.
```
In this case, monitor the evaluator upload at the link, and run the command again when ACTIVE.
## 4. Monitor Training Progress
After successful job creation, you'll see:
```
✅ Created Reinforcement Fine-tuning Job
name: accounts/pyroworks/reinforcementFineTuningJobs/sdnld4yn
📊 Dashboard Links:
Evaluator: https://app.fireworks.ai/dashboard/evaluators/test-svgagent-test-svg-generation-evaluation
Dataset: https://app.fireworks.ai/dashboard/datasets/svgbench-dataset
RFT Job: https://app.fireworks.ai/dashboard/fine-tuning/reinforcement/sdnld4yn
```
Click on the **RFT Job** link to view real-time training progress, epoch counts, and rollout data.
### Training Results
After successful training, you should see performance improvements reflected in the training metrics:
 ### SVG Quality Improvement
You can inspect individual rollouts to see the dramatic improvement in SVG generation quality. Below is a comparison between the first epoch and the final 8th epoch:
**Before (1st Epoch):**
### SVG Quality Improvement
You can inspect individual rollouts to see the dramatic improvement in SVG generation quality. Below is a comparison between the first epoch and the final 8th epoch:
**Before (1st Epoch):**
 **After (8th Epoch):**
 The reinforcement fine tuning process significantly improves the model's ability to generate accurate, detailed SVG graphics that better match the input descriptions.
## Debugging Tips
When your training is running, you have several powerful tools to debug and monitor your rollouts:
### Rollout Overview
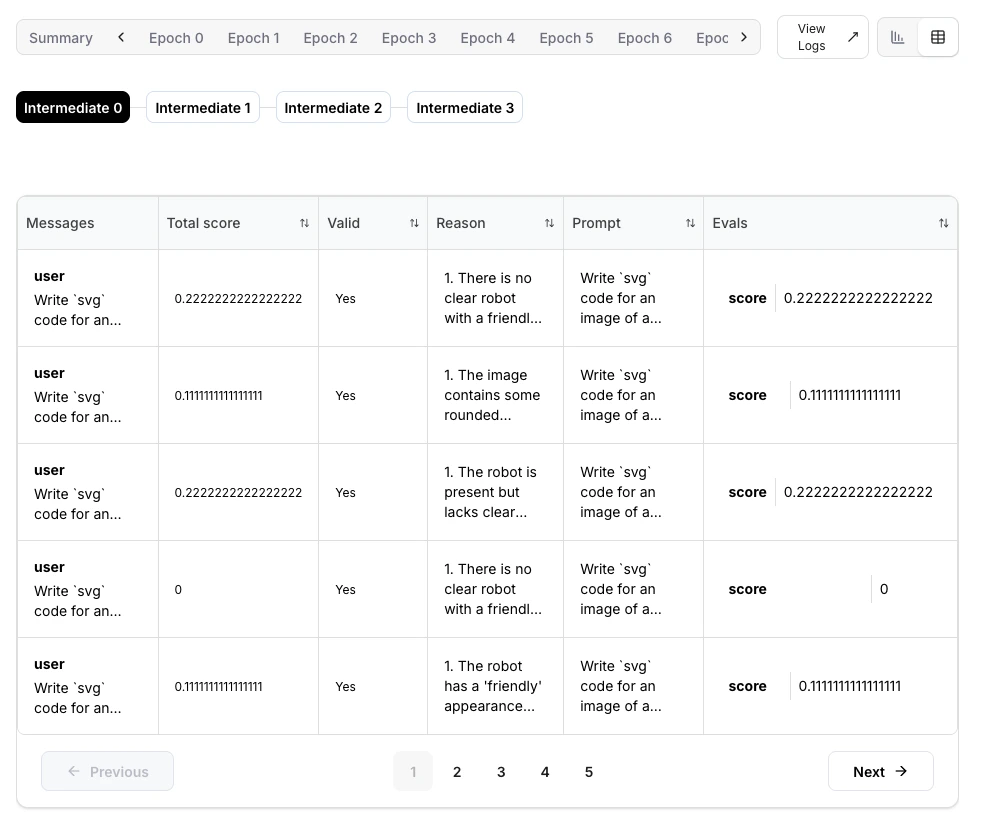
Clicking on any **Epoch** or **Step** in the training dashboard, then clicking the **table icon** to the right, will show you a comprehensive table of all rollouts. It's a good high-level overview to see if any rollouts failed and for what reason.
The reinforcement fine tuning process significantly improves the model's ability to generate accurate, detailed SVG graphics that better match the input descriptions.
## Debugging Tips
When your training is running, you have several powerful tools to debug and monitor your rollouts:
### Rollout Overview
Clicking on any **Epoch** or **Step** in the training dashboard, then clicking the **table icon** to the right, will show you a comprehensive table of all rollouts. It's a good high-level overview to see if any rollouts failed and for what reason.
 ### Individual Rollout Details
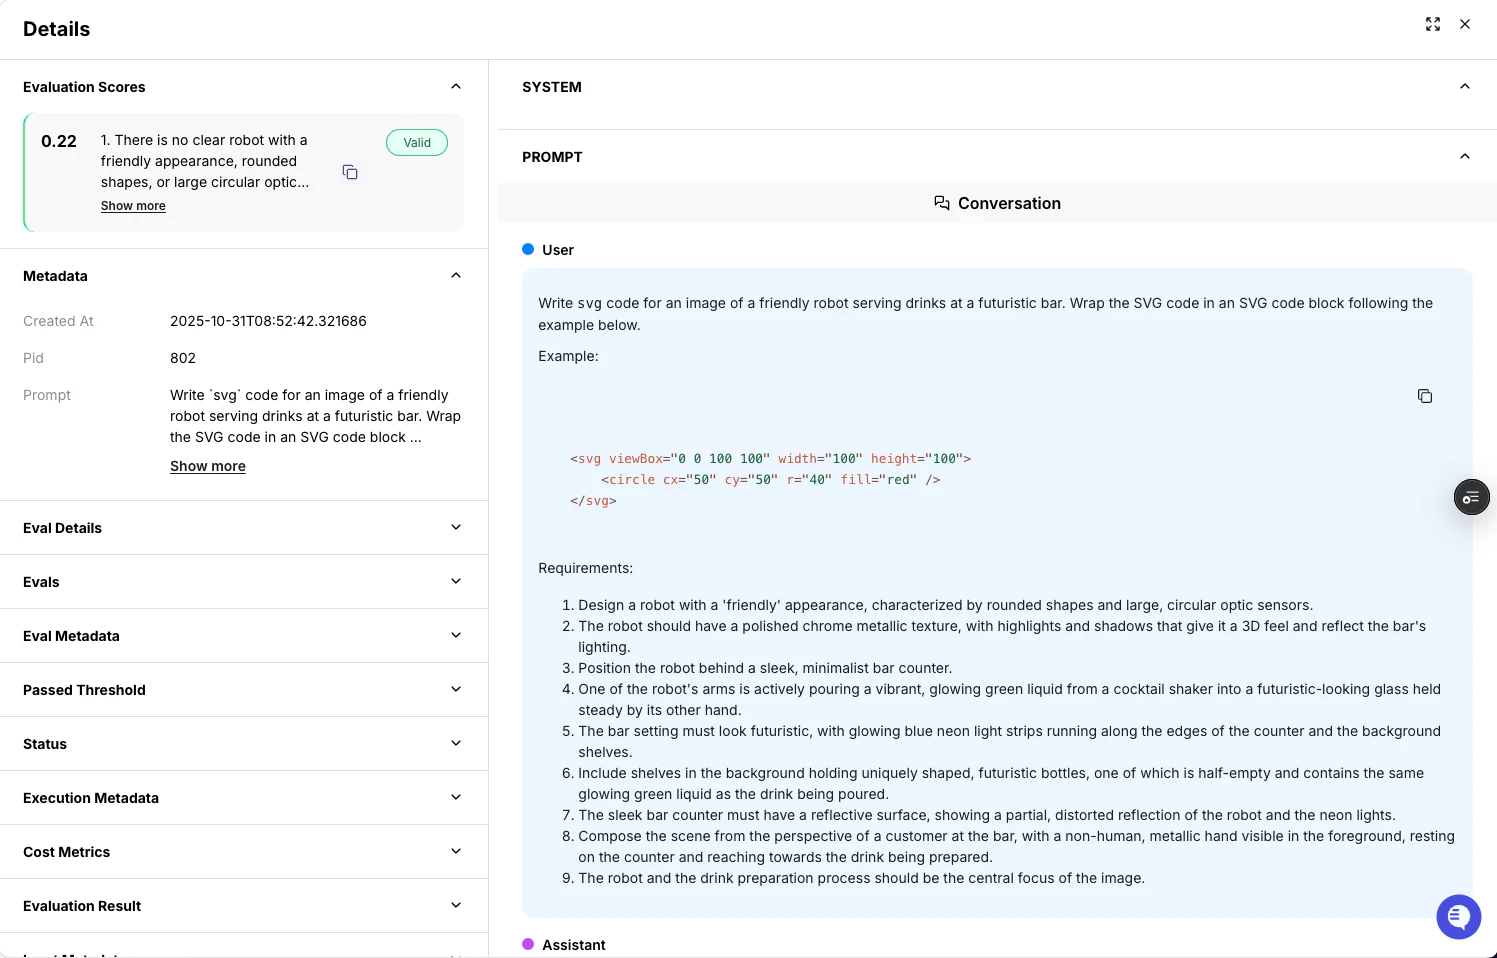
If you click on a specific row in the rollout table, you can see exactly what the prompt was and how the model responded. You can even copy and paste out the SVG code generated and render it yourself to see what the model did. This is how we got the results above in the before and after comparison.
### Individual Rollout Details
If you click on a specific row in the rollout table, you can see exactly what the prompt was and how the model responded. You can even copy and paste out the SVG code generated and render it yourself to see what the model did. This is how we got the results above in the before and after comparison.
 ### Live Log Streaming
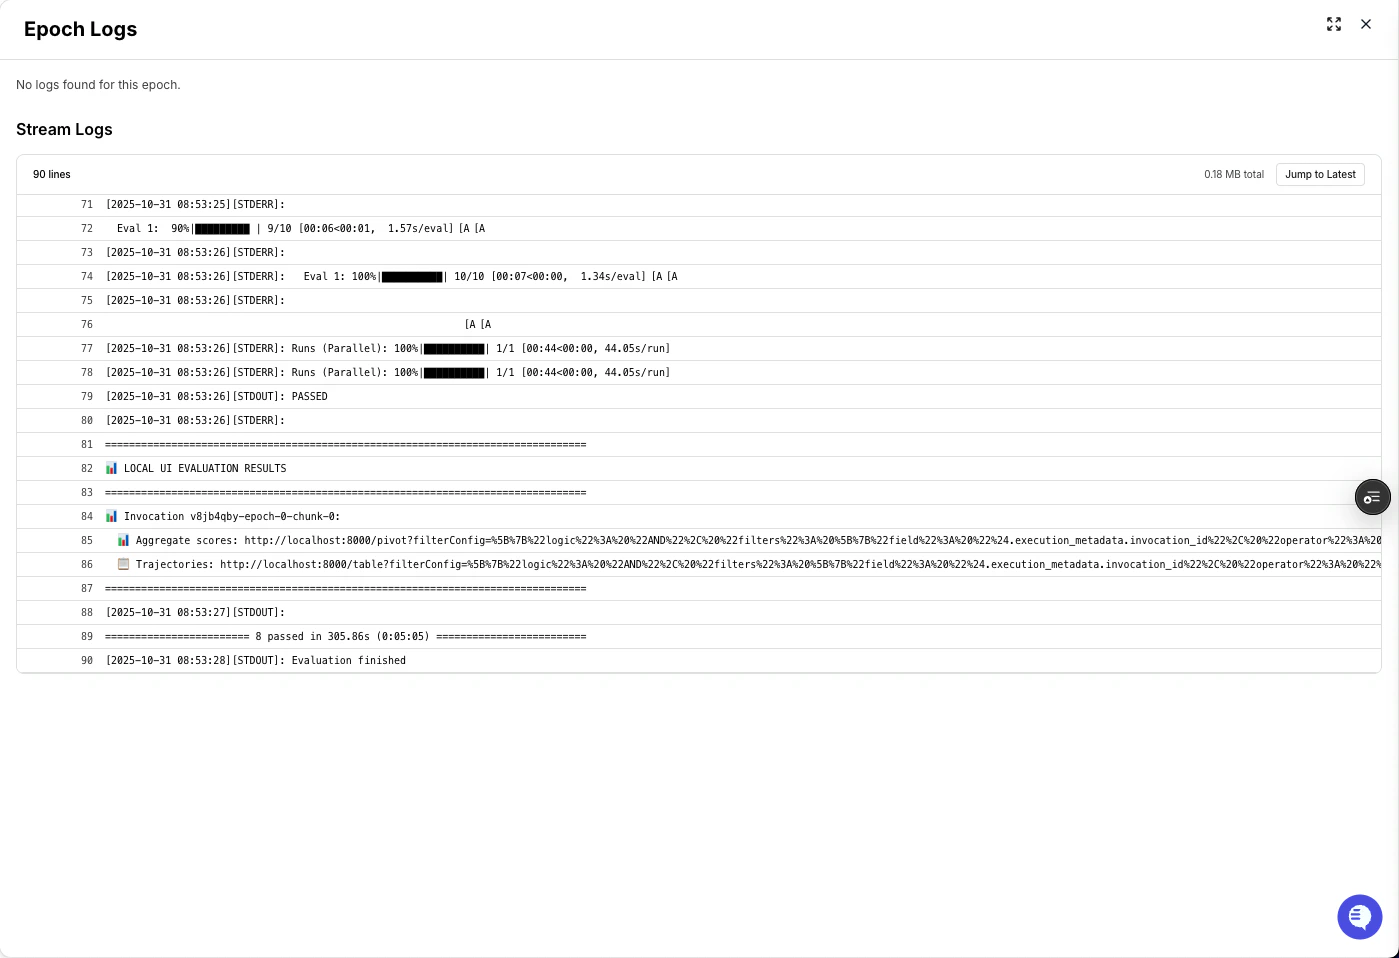
Clicking on **View Logs** takes you to a page of logs being streamed in. Here, you can see precisely what errors are happening to the rollouts. This is useful to debug and fix any issues with your rollouts.
### Live Log Streaming
Clicking on **View Logs** takes you to a page of logs being streamed in. Here, you can see precisely what errors are happening to the rollouts. This is useful to debug and fix any issues with your rollouts.
 ## Next steps
Learn all CLI options to customize your training parameters
Train models with Python evaluators for simpler tasks
Understand how reinforcement fine-tuning works
## Additional resources
* [Discord Server](https://discord.gg/mMqQxvFD9A) - Come talk to us in the #eval-protocol channel!
* [Eval Protocol Documentation](https://evalprotocol.io/introduction)
* [Remote Rollout Processor Tutorial](https://evalprotocol.io/tutorial/remote-rollout-processor)
* [SVGBench Dataset](https://github.com/johnbean393/SVGBench) - The original benchmark this project is based on
## Appendix
### How Remote Rollout Processing Works
Eval Protocol enables **reinforcement learning that meets you where you are**. Instead of forcing you to rewrite your agent in a specific framework, you can implement a lightweight remote server wherever your codebase and infrastructure already live.
Your remote server is only responsible for:
* **Executing rollouts** - Run your agent logic (in this case, SVG generation from text prompts)
* **Logging to tracing** - Send structured logs to `tracing.fireworks.ai` for evaluation (see the below linked docs for more information)
In this example, we showcase a **Vercel TypeScript server** that executes single-turn SVG code generation.
> **📖 Learn More**: For a complete deep-dive into Remote Rollout Processing, see the [Remote Rollout Processor Tutorial](https://evalprotocol.io/tutorial/remote-rollout-processor).
### Local Development Server
```bash theme={null}
cd vercel_svg_server_ts
vercel dev
```
Then swap out the `remote_base_url` to point to the local server you just started:
```
rollout_processor=RemoteRolloutProcessor(
remote_base_url="http://localhost:3000",
)
```
And in a third terminal, run the evaluation:
```bash theme={null}
ep local-test
```
> See [Vercel CLI documentation](https://vercel.com/docs/cli/dev) for more information on local development.
## Next steps
Learn all CLI options to customize your training parameters
Train models with Python evaluators for simpler tasks
Understand how reinforcement fine-tuning works
## Additional resources
* [Discord Server](https://discord.gg/mMqQxvFD9A) - Come talk to us in the #eval-protocol channel!
* [Eval Protocol Documentation](https://evalprotocol.io/introduction)
* [Remote Rollout Processor Tutorial](https://evalprotocol.io/tutorial/remote-rollout-processor)
* [SVGBench Dataset](https://github.com/johnbean393/SVGBench) - The original benchmark this project is based on
## Appendix
### How Remote Rollout Processing Works
Eval Protocol enables **reinforcement learning that meets you where you are**. Instead of forcing you to rewrite your agent in a specific framework, you can implement a lightweight remote server wherever your codebase and infrastructure already live.
Your remote server is only responsible for:
* **Executing rollouts** - Run your agent logic (in this case, SVG generation from text prompts)
* **Logging to tracing** - Send structured logs to `tracing.fireworks.ai` for evaluation (see the below linked docs for more information)
In this example, we showcase a **Vercel TypeScript server** that executes single-turn SVG code generation.
> **📖 Learn More**: For a complete deep-dive into Remote Rollout Processing, see the [Remote Rollout Processor Tutorial](https://evalprotocol.io/tutorial/remote-rollout-processor).
### Local Development Server
```bash theme={null}
cd vercel_svg_server_ts
vercel dev
```
Then swap out the `remote_base_url` to point to the local server you just started:
```
rollout_processor=RemoteRolloutProcessor(
remote_base_url="http://localhost:3000",
)
```
And in a third terminal, run the evaluation:
```bash theme={null}
ep local-test
```
> See [Vercel CLI documentation](https://vercel.com/docs/cli/dev) for more information on local development.